When we moved into our house back in July, we had two spare bedrooms. Neither one was big enough for the bed that we had in the "guest room" at our old house, so we decided one room would house Hubby Blue's desk, bookshelves and futon, and the other room would hold my desk and craft table. I had turned the guest room at the old house into a craft room for about 6 months before we moved, so I had high hopes for this room when we moved here. Well...it took 5 months to get organized, but thanks to a loooooong shelf my dad hung yesterday and a couple hours of organization today, I'm on my way to finally making my craft room usable! I'm excited to get some of these ideas I pin all over Pinterest accomplished AND keep myself busy for the long days when Hubby Blue is working.
So, of course, I celebrated all my hard work by finishing a project I envisioned months ago! I pinned this on Pinterest a full year ago:
 |
| This idea came from A Girl and a Glue Gun. |
I love, love, loved the idea of framing our first house key. We lived in our first home for the first two years of our marriage and moving out was so bittersweet. We have so many memories, good and bad, in that house, and it was the place where we started our life together. I haven't driven through our old town in a while, but even after we moved out and moved on, it still felt like home. Funny how that can happen in such a relatively short amount of time. Anyway, today, I finally got around to framing our own first house key! This project was so, so simple I don't think I even need to give you the steps, but here they are anyway! :)
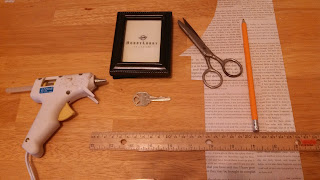
First, here are all the supplies I used:
The frame was really old (I actually salvaged it from a box of old frames that were knocking around my parents' basement) -- I don't remember what color it started as, but I spray painted it black last summer. For the paper background, I used some leftover scrapbook paper from another project I just finished that has Bible passages typed all over it. I also used a hot glue gun, a straight edge, pencil, and some really awful old school scissors. Don't judge.
My first step was cutting out the paper that would go in the frame. To do this, I just traced the glass and trimmed as needed:
 |
| This was pretty tough...I mean, I don't know if just anyone can handle this. JUST KIDDING. |
After I was sure my paper was sized correctly, I just used a few dabs of hot glue to attach the key to the paper:
 |
| Taking this picture was extremely awkward and totally posed. I'm right-handed, and this is definitely my left hand. |
Here is what the paper looked like after my fantastic gluing work:
 |
| See how intense this project is? This was sooooo complicated...right. |
Finally, I popped that little sucker into the frame, and here is the finished product!
 |
| Isn't it cute?!? If only it wasn't so labor-intensive. ;) |
There was a piece of cardboard in the frame, as there usually is in a frame, but having the key under the glass makes it pretty thick and I couldn't really fit the cardboard in anymore. I like how it looks without the glass, but I'm afraid of the key getting lost in our next move so this is probably safer.
I'm planning on hanging my new artwork on the gallery wall of pictures that go up the wall next to our stairs. That wall of pictures is one of my favorite parts of our house because whenever I look at it I remember all kinds of memories we've shared with our families and each other.
I actually have a second house key (we had TONS of doors in that house that were all keyed differently) that I will probably be turning into an ornament. Maybe I'll post that project too someday!
Do you have any mementos of "firsts" on display in your home or saved away somewhere? I'm always on the lookout for things I can save or create for when we move into our first purchased home, and I'd love to hear them!

No comments:
Post a Comment
Please note this is an anonymous blog. Thank you!